---
title: Generating Monthly Statements
description: Support at Home Monthly Statement
---
[Skip to content](https://wiki.quickclaim.io/knowledge/generating-monthly-statements#main-content)
[More support](https://wiki.quickclaim.io/knowledge/kb-tickets/new?hsLang=en) [Support portal](https://wiki.quickclaim.io/support?hsLang=en)
[.png?width=512&height=100&name=Logo%20(side-by-side).png)](https://quickclaim.com.au/)
- [Existing Tickets](https://wiki.quickclaim.io/tickets-view)
- [Knowledge Base](https://wiki.quickclaim.io/knowledge)
- [PRODA](https://proda.humanservices.gov.au/prodalogin/pages/public/login.jsf)
- [Sign out](https://wiki.quickclaim.io/_hcms/mem/logout)
Open main navigation
Close main navigation
- [Existing Tickets](https://wiki.quickclaim.io/tickets-view)
- [Knowledge Base](https://wiki.quickclaim.io/knowledge)
- [PRODA](https://proda.humanservices.gov.au/prodalogin/pages/public/login.jsf)
- [Sign out](https://wiki.quickclaim.io/_hcms/mem/logout)
- [More support](https://wiki.quickclaim.io/knowledge/kb-tickets/new)
- [Support portal](https://wiki.quickclaim.io/support)
- [Contact us](mailto:support@quickclaim.com.au)
[Contact us](mailto:support@quickclaim.com.au)
How can we help you?
- There are no suggestions because the search field is empty.
1. [Knowledge Base](https://wiki.quickclaim.io/knowledge?hsLang=en)
2. [Support at Home](https://wiki.quickclaim.io/knowledge/support-at-home?hsLang=en)
3. [Statements](https://wiki.quickclaim.io/knowledge/support-at-home?hsLang=en#statements)
# Generating Monthly Statements
## A guide on how to generate compliant and accurate monthly statements for Support at Home Care Recipients.
### Checks to perform before issuing a statement
Before issuing statements, it is important to check 2 things:
#### 1. Completeness check
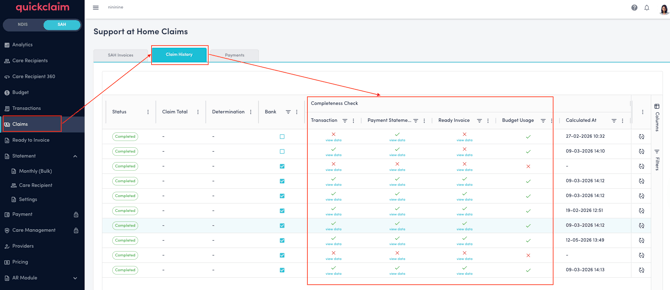
The Claim History tab on the Claims page includes a table showing the status of each claim's reconciliation check against 4 categories: Transactions, Payment Statements, Ready to Invoice and Budget Usage.
The purpose of the completeness check is to ensure that the data remains consistent throughout the entire process. This includes:
- The data submitted in the claim.
- The data that is successfully claimed.
- The payment statement received from Support at Home.
- The invoice splitting and budget deductions recorded in Support at Home.
The completeness check verifies that all four stages contain exactly the same information, with no discrepancies, down to the cent.
To run a completeness check, click the icon on the far right of each claim record.
**Payment statements**
The payment statement represents the final outcome of all processing performed by Services Australia. In addition to processing submitted claims and cancellations, Services Australia may apply adjustments based on changes to a care recipient's circumstances, such as moving from one level to another. These may result in adjustments in the payments. While performing the completeness check quickclaim verifies that the total amount of all submitted debits and credits matches the total amount reflected in the payment statement.
These details should also match the issued invoices to make sure the invoice splitting process didn't impact/alter any data. When everything matches, there is a green tick in the completeness check.
**Budget usage**
Budget usage is also validated as part of the completeness check. Any budget deductions resulting from claims, cancellations, or adjustments must be correctly deducted.
**The 2 validation checks above must pass before statements can be issued.** If a discrepancy is detected, a cross icon will be displayed. Users can hover over the cross icon to view detailed information about the discrepancy and identify the source of the mismatch.
When there is a mismatch, users can also export the data to view all the details in the export. This way, user will be able to view the data in transactions, payments and ready to invoice more clearly in one go.
**Transactions**
If you have submitted invoices to Services Australia outside of quickclaim, the transactions check will not be relevant.
For transactions, both debit and credit entries must be considered. When claims are processed through Support at Home, cancellations may also be submitted. While cancellation transactions are recorded immediately, they are not actioned until the next claiming process has been started. During each claiming process, Services Australia processes both new claim submissions (debits) and cancellation submissions (credits).
**Ready to Invoice**
This check reconciles all of the items in the 'Ready to Invoice' page against the payment statement. If all of the debits and credits in this section, across all of the financial contacts (Department, Co-Contribution contact, Provider Held Funds, etc.) add up to the payment statement amount then this check will pass.
If you are not using quickclaim to issue invoices to your clients, the 'Ready to Invoice' check will not be relevant.
#### 2. Support at home Statement delivery information
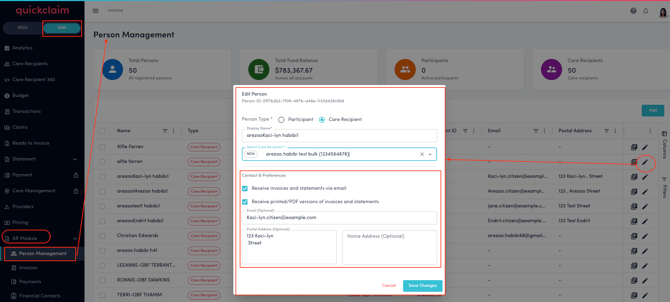
All the information regarding the postal address or email address, including who wants to receive the statements via post or by email, all of this information should be added to the system before issuing statements.
- In order to update this, go to the AR module\> Person Management.
- Search for the Person whose contact details need to be updated.
- Click on the Edit icon for the Person you want to update the contact preferences for.
- You can check the check boxes to receive statements via email or by post, or both.
- Depending on the selection, update the contact preferences and save.
### Generating the Statements
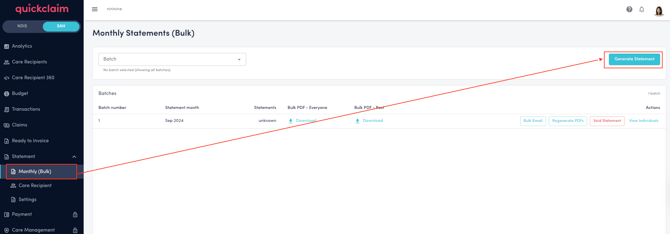
Once all of the checks above are successful, go to SAH\> Statements\> Monthly(Bulk) page and click on the Generate Statement Button.
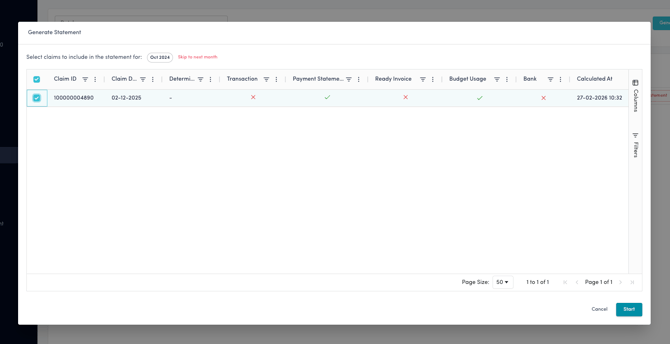
Select all of the claims that you would like to include for a particular month.
Claims must be included in statement based on the chronological order in which the payments for those claims were received. This means you must include all of the claims since the last statement was generated (any claim included in a previous statement will not be available for selection) up to a particular point in time. You cannot 'skip' claims.
Click on **Next** to Generate the monthly statement.
All of your statements, including the Bulk files and individual files, will now be generated. Depending on the number of statements, this may take several minutes.
- [Getting Started](https://wiki.quickclaim.io/knowledge/getting-started?hsLang=en#main-content)
- [NDIS APIs](https://wiki.quickclaim.io/knowledge/getting-started?hsLang=en#ndis-apis)
- [Aged Care Web Services](https://wiki.quickclaim.io/knowledge/getting-started?hsLang=en#aged-care-web-services)
- [Accounts Receivable (AR) Module](https://wiki.quickclaim.io/knowledge/accounts-receivable-ar-module?hsLang=en)
- [NDIS](https://wiki.quickclaim.io/knowledge/ndis?hsLang=en#main-content)
- [Participants](https://wiki.quickclaim.io/knowledge/ndis?hsLang=en#participants)
- [Service Bookings](https://wiki.quickclaim.io/knowledge/ndis?hsLang=en#service-bookings)
- [Budget](https://wiki.quickclaim.io/knowledge/ndis?hsLang=en#budget)
- [Roster of Care](https://wiki.quickclaim.io/knowledge/ndis?hsLang=en#roster-of-care)
- [Service Delivery](https://wiki.quickclaim.io/knowledge/ndis?hsLang=en#service-delivery)
- [Claiming Workflow](https://wiki.quickclaim.io/knowledge/ndis?hsLang=en#claiming-workflow)
- [Invoicing Workflow](https://wiki.quickclaim.io/knowledge/ndis?hsLang=en#invoicing-workflow)
- [Support at Home](https://wiki.quickclaim.io/knowledge/support-at-home?hsLang=en#main-content)
- [Care Recipients](https://wiki.quickclaim.io/knowledge/support-at-home?hsLang=en#care-recipients)
- [Care Recipient 360](https://wiki.quickclaim.io/knowledge/support-at-home?hsLang=en#care-recipient-360)
- [Budget](https://wiki.quickclaim.io/knowledge/support-at-home?hsLang=en#budget)
- [Transactions](https://wiki.quickclaim.io/knowledge/support-at-home?hsLang=en#transactions)
- [Claims](https://wiki.quickclaim.io/knowledge/support-at-home?hsLang=en#claims)
- [Ready to Invoice](https://wiki.quickclaim.io/knowledge/support-at-home?hsLang=en#ready-to-invoice)
- [Statements](https://wiki.quickclaim.io/knowledge/support-at-home?hsLang=en#statements)
- [Tableau Analytics](https://wiki.quickclaim.io/knowledge/tableau-analytics?hsLang=en)
- [Settings](https://wiki.quickclaim.io/knowledge/settings?hsLang=en#main-content)
- [Registrations](https://wiki.quickclaim.io/knowledge/settings?hsLang=en#registrations)
- [Notifications](https://wiki.quickclaim.io/knowledge/settings?hsLang=en#notifications)
- [Releases](https://wiki.quickclaim.io/knowledge/releases?hsLang=en)
- [For Developers](https://wiki.quickclaim.io/knowledge/for-developers?hsLang=en#main-content)
- [API Getting Started](https://wiki.quickclaim.io/knowledge/for-developers?hsLang=en#api-getting-started)
- [Sandbox and Authentication](https://wiki.quickclaim.io/knowledge/for-developers?hsLang=en#sandbox-and-authentication)
- [Public API Reference](https://wiki.quickclaim.io/knowledge/for-developers?hsLang=en#public-api-reference)
- [Budget APIs](https://wiki.quickclaim.io/knowledge/for-developers?hsLang=en#budget-apis)
- [Errors and Limits](https://wiki.quickclaim.io/knowledge/for-developers?hsLang=en#errors-and-limits)
- [NDIS Rejection Codes](https://wiki.quickclaim.io/knowledge/for-developers?hsLang=en#ndis-rejection-codes)
- [Link](https://wiki.quickclaim.io/knowledge/link?hsLang=en#main-content)
- [Invoices](https://wiki.quickclaim.io/knowledge/link?hsLang=en#invoices)
- [Provider Remittance Advice](https://wiki.quickclaim.io/knowledge/link?hsLang=en#provider-remittance-advice)
- [Settings](https://wiki.quickclaim.io/knowledge/link?hsLang=en#settings)
- [Managing Payments](https://wiki.quickclaim.io/knowledge/link?hsLang=en#managing-payments)
[.png?width=113&height=24&name=quickclaim%20logo%20(high-res).png "Chill listening crop-3")](https://quickclaim.com.au)
[mailto:email@email.com](mailto:email@email.com)
Copyright © 2026, quickclaim