---
title: How to import Transactions using User Fields
description: import data user fields transactions
---
[Skip to content](https://wiki.quickclaim.io/knowledge/how-to-import-transactions-using-user-fields#main-content)
[More support](https://wiki.quickclaim.io/knowledge/kb-tickets/new?hsLang=en) [Support portal](https://wiki.quickclaim.io/support?hsLang=en)
[.png?width=512&height=100&name=Logo%20(side-by-side).png)](https://quickclaim.com.au/)
- [Existing Tickets](https://wiki.quickclaim.io/tickets-view)
- [Knowledge Base](https://wiki.quickclaim.io/knowledge)
- [PRODA](https://proda.humanservices.gov.au/prodalogin/pages/public/login.jsf)
- [Sign out](https://wiki.quickclaim.io/_hcms/mem/logout)
Open main navigation
Close main navigation
- [Existing Tickets](https://wiki.quickclaim.io/tickets-view)
- [Knowledge Base](https://wiki.quickclaim.io/knowledge)
- [PRODA](https://proda.humanservices.gov.au/prodalogin/pages/public/login.jsf)
- [Sign out](https://wiki.quickclaim.io/_hcms/mem/logout)
- [More support](https://wiki.quickclaim.io/knowledge/kb-tickets/new)
- [Support portal](https://wiki.quickclaim.io/support)
- [Contact us](mailto:support@quickclaim.com.au)
[Contact us](mailto:support@quickclaim.com.au)
How can we help you?
- There are no suggestions because the search field is empty.
1. [Knowledge Base](https://wiki.quickclaim.io/knowledge?hsLang=en)
2. [Support at Home](https://wiki.quickclaim.io/knowledge/support-at-home?hsLang=en)
3. [Transactions](https://wiki.quickclaim.io/knowledge/support-at-home?hsLang=en#transactions)
# How to import Transactions using User Fields
## This guide explains how to import transactions into the SAH module with custom User Fields.
#### Step 1: Go to the Transactions Page
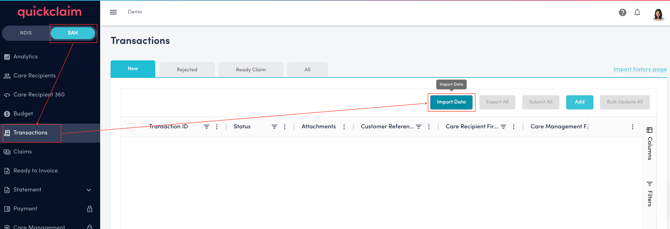
1. If you use quickclaim for both NDIS and SAH billing, navigate to the **SAH** tab.
2. Open the **Transactions** page.
3. Click the **Import Data** button.
#### Step 2: Download the Sample File
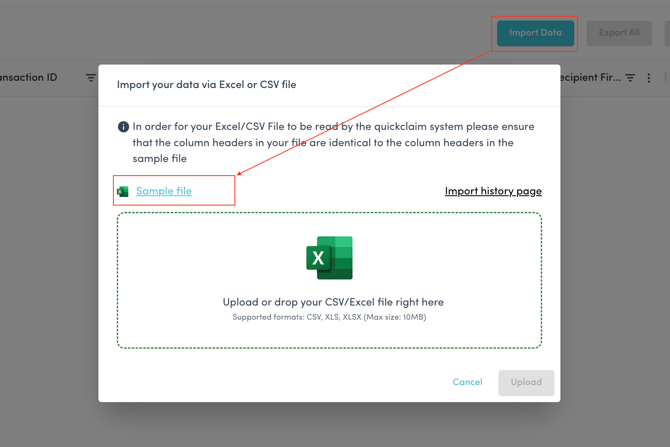
Inside the import window, there is a link to download the sample import file. Download this file and use it as your template for importing transactions.
#### Step 3: Understand the User Field Columns
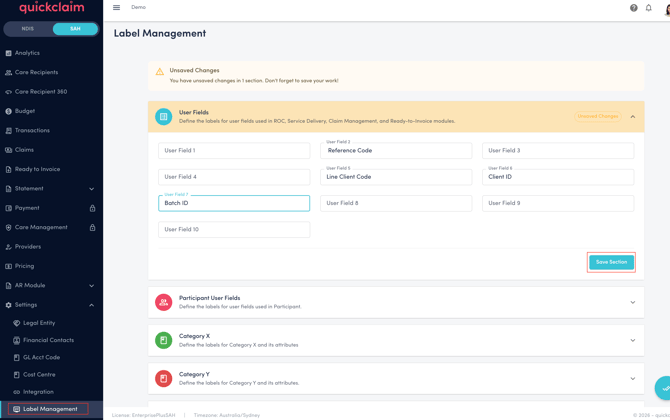
The sample file contains columns for up to 10 User Fields (plus Category X and Category Y). These User Fields are connected to your **Label Management** configuration.
Example:
- If **User Field 6** is mapped to **Client ID** in your CRM, then you should enter the Client Number values in the **User Field 1** column.
Do Not Change the Column Headers
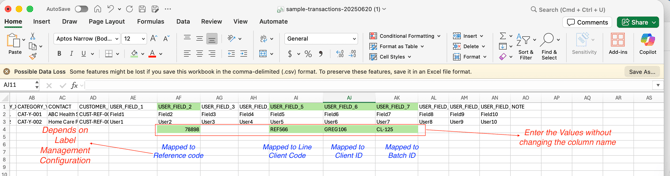
The column headers in the sample file must remain exactly the same. The system recognises the fields based on the header names.
- ✅ Correct: Keep the header as `User Field 1`
- ❌ Incorrect: Rename it to `Client Number`
Only fill in the values under the existing headers.
#### Step 4: Fill in the Data
Populate the rows with your transaction data.
The first 2 rows in the sample file are guide or sample of what type of values are accepted.
*Note!! If you are using the sample file please delete the sample records before importing.*
Please follow the guide to fill out all required details. **Do not change any header name on Row 1** as the system requires exact same headers to recognise your input.
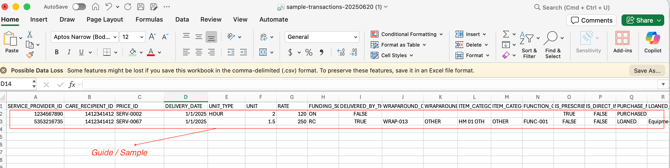
*If you are using your own file, in order for your Excel/CSV File to be read by the quickclaim system please ensure that the column headers in your file are identical to the column headers in the sample file.*
**For mapped user fields:**
- Enter the relevant values based on your Label Management mapping.
- Leave the header names unchanged.
Example:
| User Field 1 | User Field 2 |
| --- | --- |
| CLT001 | Sydney |
| CLT002 | Melbourne |
Where:
- `User Field 1` = Client Number
- `User Field 2` = Region
#### Step 5: Import the File
1. Save the completed file.
2. Return to the **Transactions** page.
3. Click **Import Data**.
4. Upload the completed file.
5. Confirm the import.
The system will process the transactions using the mapped User Field values.
- [Getting Started](https://wiki.quickclaim.io/knowledge/getting-started?hsLang=en#main-content)
- [NDIS APIs](https://wiki.quickclaim.io/knowledge/getting-started?hsLang=en#ndis-apis)
- [Aged Care Web Services](https://wiki.quickclaim.io/knowledge/getting-started?hsLang=en#aged-care-web-services)
- [Accounts Receivable (AR) Module](https://wiki.quickclaim.io/knowledge/accounts-receivable-ar-module?hsLang=en)
- [NDIS](https://wiki.quickclaim.io/knowledge/ndis?hsLang=en#main-content)
- [Participants](https://wiki.quickclaim.io/knowledge/ndis?hsLang=en#participants)
- [Service Bookings](https://wiki.quickclaim.io/knowledge/ndis?hsLang=en#service-bookings)
- [Budget](https://wiki.quickclaim.io/knowledge/ndis?hsLang=en#budget)
- [Roster of Care](https://wiki.quickclaim.io/knowledge/ndis?hsLang=en#roster-of-care)
- [Service Delivery](https://wiki.quickclaim.io/knowledge/ndis?hsLang=en#service-delivery)
- [Claiming Workflow](https://wiki.quickclaim.io/knowledge/ndis?hsLang=en#claiming-workflow)
- [Invoicing Workflow](https://wiki.quickclaim.io/knowledge/ndis?hsLang=en#invoicing-workflow)
- [Support at Home](https://wiki.quickclaim.io/knowledge/support-at-home?hsLang=en#main-content)
- [Care Recipients](https://wiki.quickclaim.io/knowledge/support-at-home?hsLang=en#care-recipients)
- [Care Recipient 360](https://wiki.quickclaim.io/knowledge/support-at-home?hsLang=en#care-recipient-360)
- [Budget](https://wiki.quickclaim.io/knowledge/support-at-home?hsLang=en#budget)
- [Transactions](https://wiki.quickclaim.io/knowledge/support-at-home?hsLang=en#transactions)
- [Claims](https://wiki.quickclaim.io/knowledge/support-at-home?hsLang=en#claims)
- [Ready to Invoice](https://wiki.quickclaim.io/knowledge/support-at-home?hsLang=en#ready-to-invoice)
- [Statements](https://wiki.quickclaim.io/knowledge/support-at-home?hsLang=en#statements)
- [Tableau Analytics](https://wiki.quickclaim.io/knowledge/tableau-analytics?hsLang=en)
- [Settings](https://wiki.quickclaim.io/knowledge/settings?hsLang=en#main-content)
- [Registrations](https://wiki.quickclaim.io/knowledge/settings?hsLang=en#registrations)
- [Notifications](https://wiki.quickclaim.io/knowledge/settings?hsLang=en#notifications)
- [Releases](https://wiki.quickclaim.io/knowledge/releases?hsLang=en)
- [For Developers](https://wiki.quickclaim.io/knowledge/for-developers?hsLang=en#main-content)
- [API Getting Started](https://wiki.quickclaim.io/knowledge/for-developers?hsLang=en#api-getting-started)
- [Sandbox and Authentication](https://wiki.quickclaim.io/knowledge/for-developers?hsLang=en#sandbox-and-authentication)
- [Public API Reference](https://wiki.quickclaim.io/knowledge/for-developers?hsLang=en#public-api-reference)
- [Budget APIs](https://wiki.quickclaim.io/knowledge/for-developers?hsLang=en#budget-apis)
- [Errors and Limits](https://wiki.quickclaim.io/knowledge/for-developers?hsLang=en#errors-and-limits)
- [NDIS Rejection Codes](https://wiki.quickclaim.io/knowledge/for-developers?hsLang=en#ndis-rejection-codes)
- [Link](https://wiki.quickclaim.io/knowledge/link?hsLang=en#main-content)
- [Invoices](https://wiki.quickclaim.io/knowledge/link?hsLang=en#invoices)
- [Provider Remittance Advice](https://wiki.quickclaim.io/knowledge/link?hsLang=en#provider-remittance-advice)
- [Settings](https://wiki.quickclaim.io/knowledge/link?hsLang=en#settings)
- [Managing Payments](https://wiki.quickclaim.io/knowledge/link?hsLang=en#managing-payments)
[.png?width=113&height=24&name=quickclaim%20logo%20(high-res).png "Chill listening crop-3")](https://quickclaim.com.au)
[mailto:email@email.com](mailto:email@email.com)
Copyright © 2026, quickclaim