---
title: NDIA API Gateway - Provider Onboarding Guide
description: Guide to connecting to the NDIA APIs through quickclaim
---
[Skip to content](https://wiki.quickclaim.io/knowledge/ndia-api-gateway-provider-onboarding-guide#main-content)
[More support](https://wiki.quickclaim.io/knowledge/kb-tickets/new?hsLang=en) [Support portal](https://wiki.quickclaim.io/support?hsLang=en)
[.png?width=512&height=100&name=Logo%20(side-by-side).png)](https://quickclaim.com.au/)
- [Existing Tickets](https://wiki.quickclaim.io/tickets-view)
- [Knowledge Base](https://wiki.quickclaim.io/knowledge)
- [PRODA](https://proda.humanservices.gov.au/prodalogin/pages/public/login.jsf)
- [Sign out](https://wiki.quickclaim.io/_hcms/mem/logout)
Open main navigation
Close main navigation
- [Existing Tickets](https://wiki.quickclaim.io/tickets-view)
- [Knowledge Base](https://wiki.quickclaim.io/knowledge)
- [PRODA](https://proda.humanservices.gov.au/prodalogin/pages/public/login.jsf)
- [Sign out](https://wiki.quickclaim.io/_hcms/mem/logout)
- [More support](https://wiki.quickclaim.io/knowledge/kb-tickets/new)
- [Support portal](https://wiki.quickclaim.io/support)
- [Contact us](mailto:support@quickclaim.com.au)
[Contact us](mailto:support@quickclaim.com.au)
How can we help you?
- There are no suggestions because the search field is empty.
1. [Knowledge Base](https://wiki.quickclaim.io/knowledge?hsLang=en)
2. [Getting Started](https://wiki.quickclaim.io/knowledge/getting-started?hsLang=en)
3. [NDIS APIs](https://wiki.quickclaim.io/knowledge/getting-started?hsLang=en#ndis-apis)
# NDIA API Gateway - Provider Onboarding Guide
## How to get connected to the NDIA API Gateway through the new Digital Partners Portal (DPP)
### **Overview**
The NDIA has created a new portal for Digital Partners to connect to the NDIA API Gateway. This process replaces the old PRODA gateway managed by Services Australia. Connection to the API gateway is necessary to authorise quickclaim to interact with the NDIA APIs on your behalf.
Connection to the gateway involves two steps:
1. [Set up your DigitalID and link your organisation in Relationship Authorisation Manager (RAM).](https://wiki.quickclaim.io/knowledge/ndia-api-gateway-provider-onboarding-guide#SetupDigitalID)
2. [Log into the DPP to create a 'Device' (this is what links quickclaim to your organisation).](https://wiki.quickclaim.io/knowledge/ndia-api-gateway-provider-onboarding-guide#CreatingADevice)
### **Setting up your DigitalID and linking your organisation in RAM**
#### Creating your DigitalID
You can find instructions on how to set up your DigitalID on the [my.gov website](https://my.gov.au/en/about/help/digital-id).
You must upgrade your DigitalID strength to 'Strong' to be able to access the NDIA Digital Partners Portal.
#### Linking your DigitalID to your organisation in RAM
Once you have your DigitalID set up, you'll need to link your organisation to your DigitalID in RAM. To do this, follow the [instructions provided by the Australian Tax Office (ATO)](https://info.authorisationmanager.gov.au/link-to-a-business-in-ram/set-up-a-business-in-ram/link-your-business-online).
Only a person listed as a 'Principal Authority' (usually an officeholder) on the Australian Business Register (ABR) can link their organisation to their DigitalID. Find out more about who can access RAM [here](https://info.authorisationmanager.gov.au/link-to-a-business-in-ram/set-up-a-business-in-ram/who-can-set-up).
#### Authorising employees or representatives to act on your behalf
If you are planning on completing the onboarding process yourself, the steps below are optional.
Once your DigitalID and organisation are linked in RAM, you can authorise employees to access the DPP. To do this:
1. Log into RAM using your DigitalID
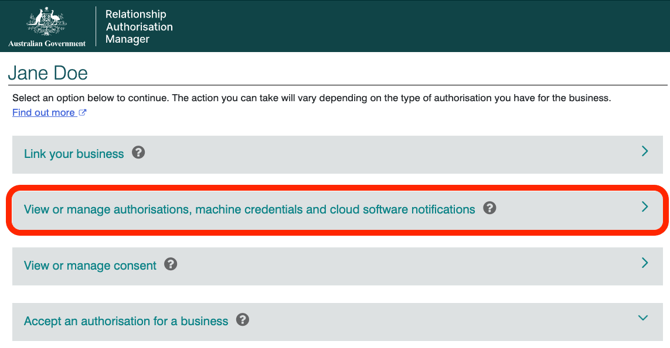
2. Select 'View or manage authorisations, machine credentials and cloud software notifications' (see below).
3. Select your organisation from the list.
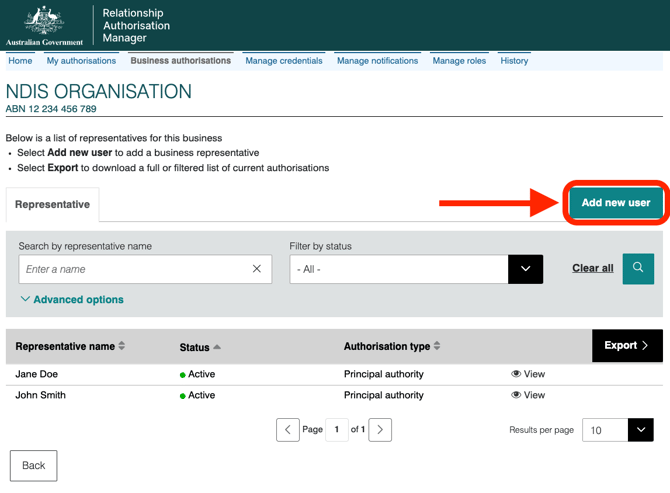
4. Click 'Add User' (see below).
5. Select 'Standard User'
6. On the 'Representative Details' step, enter your employee's details, making sure to enter them EXACTLY as they appear in their DigitalID. The process will fail if there are any mismatches.
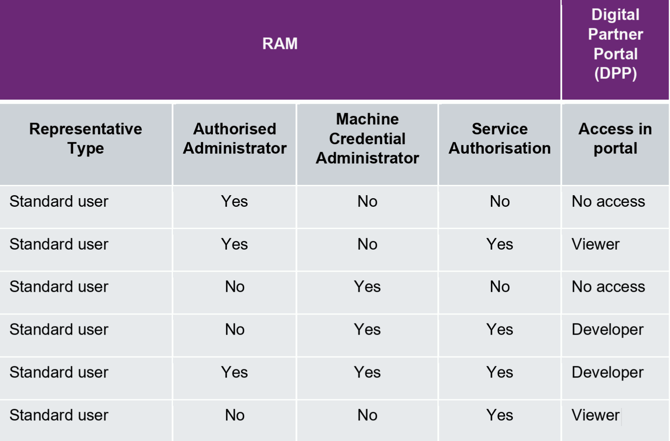
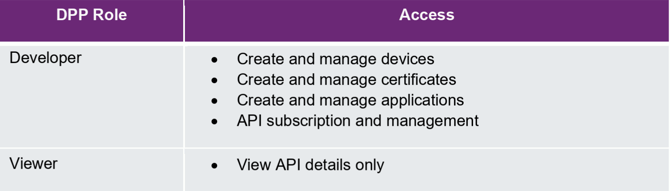
7. On the 'Authorisation Details' step, use the guide below to determine which boxes to check (Service Authorisation will be selected at the 'Agency Details' step).
It is unusual to need to view API details only, so the default decision should be to provide Machine Credentials. Only check 'Authorised Administrator' if the employee will need to authorise other employees in RAM.
8. On the 'Agency Details' step, search for 'NDIS' and select 'NDIS- Developer Portal for Digital Partners' (see below).
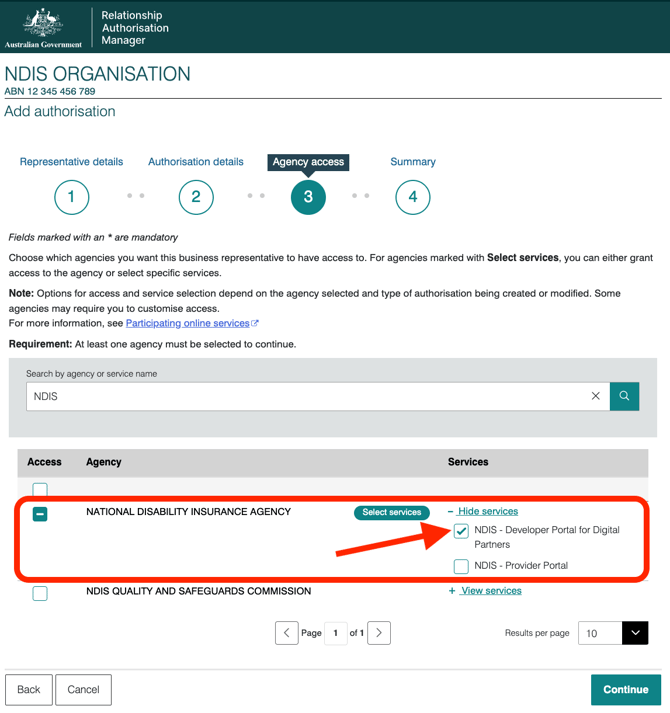
9. Check the declaration checkbox and hit Submit.
### **Creating a Device in the Digital Partners Portal**
Follow the steps below to create a B2B Device in the NDIA DPP, authorising quickclaim to connect to the NDIA APIs on your behalf.
1. Log into the DPP here: [https://apiportal.ndis.gov.au/](https://apiportal.ndis.gov.au/)
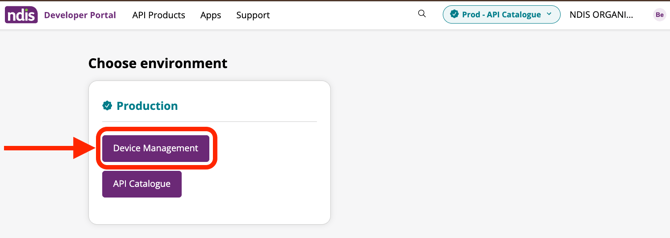
2. Select 'Device Management' from the Production environment (you may not have more than one environment).
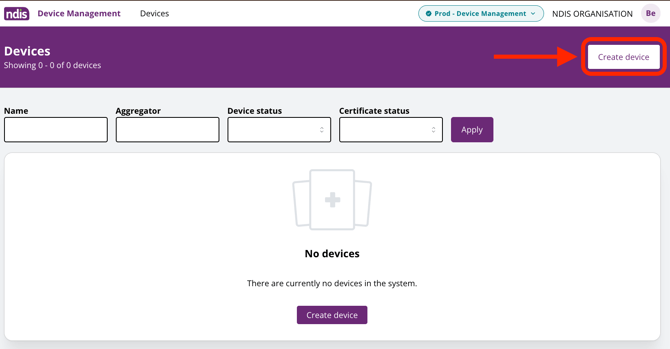
3. Select 'Create Device'
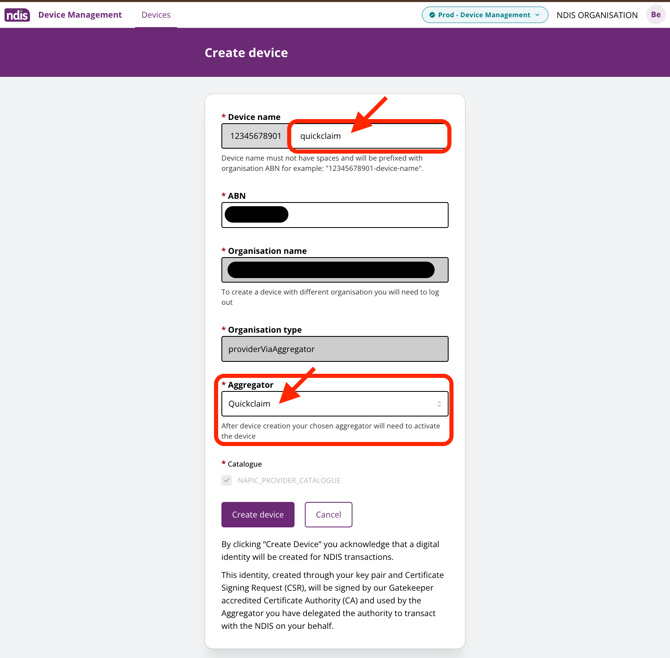
4. Enter the Device name as 'quickclaim' (***please note this is case sensitive***), select quickclaim from the Aggregator dropdown list (ironically, quickclaim is spelled with a capital Q here, but the NDIA can't be perfect) and click 'Create Device' to complete the step.
5. After completing the steps above, you should see the Device appear in your list of devices with the status 'Pending' (see below).
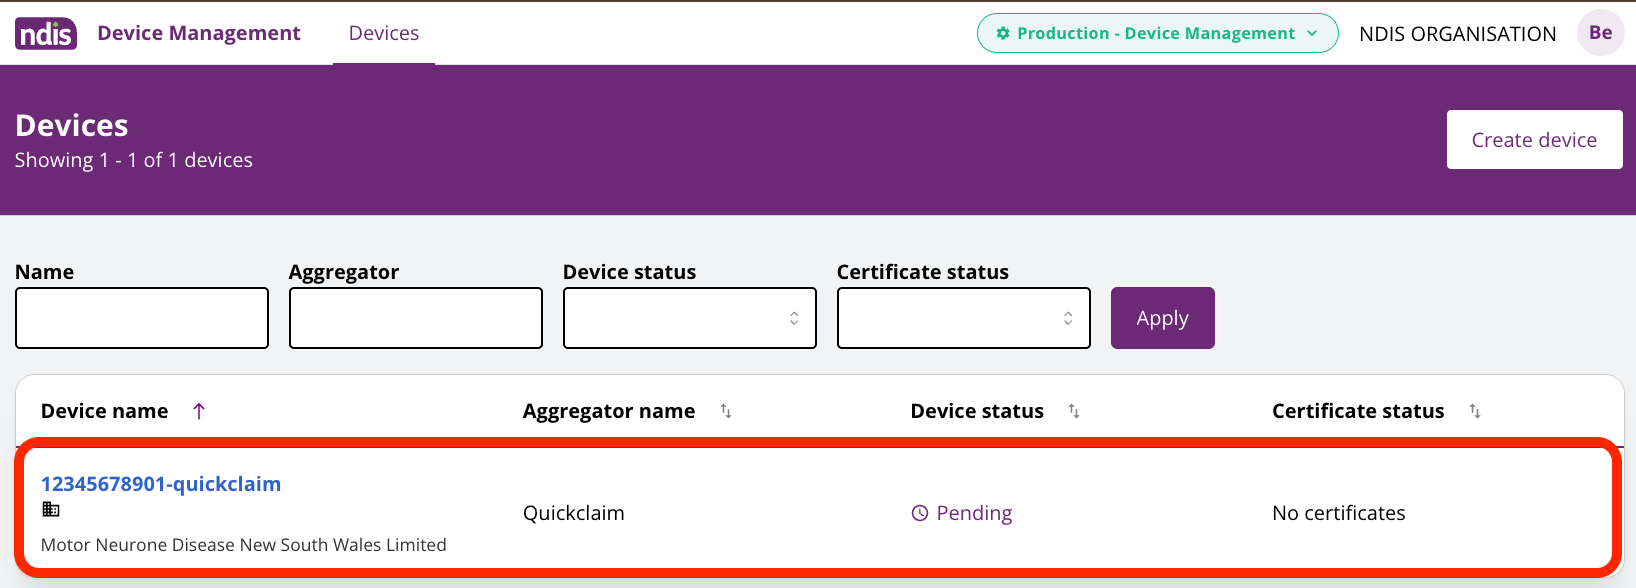
Once the Device has been created, please notify quickclaim support at [support@quickclaim.com.au](mailto:support@quickclaim.com.au). The device will be activated by quickclaim within 72 hours.
- [Getting Started](https://wiki.quickclaim.io/knowledge/getting-started?hsLang=en#main-content)
- [NDIS APIs](https://wiki.quickclaim.io/knowledge/getting-started?hsLang=en#ndis-apis)
- [Aged Care Web Services](https://wiki.quickclaim.io/knowledge/getting-started?hsLang=en#aged-care-web-services)
- [Accounts Receivable (AR) Module](https://wiki.quickclaim.io/knowledge/accounts-receivable-ar-module?hsLang=en)
- [NDIS](https://wiki.quickclaim.io/knowledge/ndis?hsLang=en#main-content)
- [Participants](https://wiki.quickclaim.io/knowledge/ndis?hsLang=en#participants)
- [Service Bookings](https://wiki.quickclaim.io/knowledge/ndis?hsLang=en#service-bookings)
- [Budget](https://wiki.quickclaim.io/knowledge/ndis?hsLang=en#budget)
- [Roster of Care](https://wiki.quickclaim.io/knowledge/ndis?hsLang=en#roster-of-care)
- [Service Delivery](https://wiki.quickclaim.io/knowledge/ndis?hsLang=en#service-delivery)
- [Claiming Workflow](https://wiki.quickclaim.io/knowledge/ndis?hsLang=en#claiming-workflow)
- [Invoicing Workflow](https://wiki.quickclaim.io/knowledge/ndis?hsLang=en#invoicing-workflow)
- [Support at Home](https://wiki.quickclaim.io/knowledge/support-at-home?hsLang=en#main-content)
- [Care Recipients](https://wiki.quickclaim.io/knowledge/support-at-home?hsLang=en#care-recipients)
- [Care Recipient 360](https://wiki.quickclaim.io/knowledge/support-at-home?hsLang=en#care-recipient-360)
- [Budget](https://wiki.quickclaim.io/knowledge/support-at-home?hsLang=en#budget)
- [Transactions](https://wiki.quickclaim.io/knowledge/support-at-home?hsLang=en#transactions)
- [Claims](https://wiki.quickclaim.io/knowledge/support-at-home?hsLang=en#claims)
- [Ready to Invoice](https://wiki.quickclaim.io/knowledge/support-at-home?hsLang=en#ready-to-invoice)
- [Statements](https://wiki.quickclaim.io/knowledge/support-at-home?hsLang=en#statements)
- [Tableau Analytics](https://wiki.quickclaim.io/knowledge/tableau-analytics?hsLang=en)
- [Settings](https://wiki.quickclaim.io/knowledge/settings?hsLang=en#main-content)
- [Registrations](https://wiki.quickclaim.io/knowledge/settings?hsLang=en#registrations)
- [Notifications](https://wiki.quickclaim.io/knowledge/settings?hsLang=en#notifications)
- [Releases](https://wiki.quickclaim.io/knowledge/releases?hsLang=en)
- [For Developers](https://wiki.quickclaim.io/knowledge/for-developers?hsLang=en#main-content)
- [API Getting Started](https://wiki.quickclaim.io/knowledge/for-developers?hsLang=en#api-getting-started)
- [Sandbox and Authentication](https://wiki.quickclaim.io/knowledge/for-developers?hsLang=en#sandbox-and-authentication)
- [Public API Reference](https://wiki.quickclaim.io/knowledge/for-developers?hsLang=en#public-api-reference)
- [Budget APIs](https://wiki.quickclaim.io/knowledge/for-developers?hsLang=en#budget-apis)
- [Errors and Limits](https://wiki.quickclaim.io/knowledge/for-developers?hsLang=en#errors-and-limits)
- [NDIS Rejection Codes](https://wiki.quickclaim.io/knowledge/for-developers?hsLang=en#ndis-rejection-codes)
- [Link](https://wiki.quickclaim.io/knowledge/link?hsLang=en#main-content)
- [Invoices](https://wiki.quickclaim.io/knowledge/link?hsLang=en#invoices)
- [Provider Remittance Advice](https://wiki.quickclaim.io/knowledge/link?hsLang=en#provider-remittance-advice)
- [Settings](https://wiki.quickclaim.io/knowledge/link?hsLang=en#settings)
- [Managing Payments](https://wiki.quickclaim.io/knowledge/link?hsLang=en#managing-payments)
[.png?width=113&height=24&name=quickclaim%20logo%20(high-res).png "Chill listening crop-3")](https://quickclaim.com.au)
[mailto:email@email.com](mailto:email@email.com)
Copyright © 2026, quickclaim