.png?width=512&height=100&name=Logo%20(side-by-side).png)
Contents
Overview
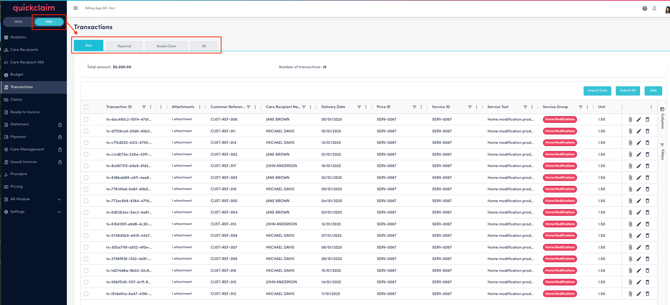
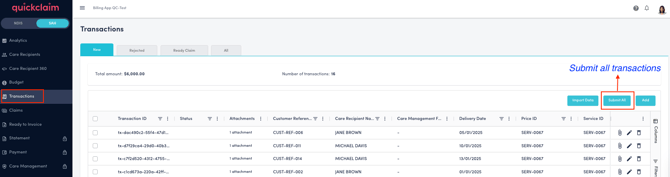
The Transactions screen contains four tabs that categorise transactions by their status:
-
New – Contains newly added transactions that are yet to be submitted.
-
Rejected – Displays transactions that were rejected, along with error details.
-
Ready Claim – Shows transactions successfully validated and ready for claiming.
-
All Transactions – Provides a complete list of all transactions across statuses.
Each tab provides comprehensive transaction details, including:
- Status of the transactions and error reason (if any)
- Attachments
- Customer Reference Details
- Care Recipient Details
- Service Details
- Financial Information (e.g., Funding Source, Unit, Rate, Amount, Contacts, etc)
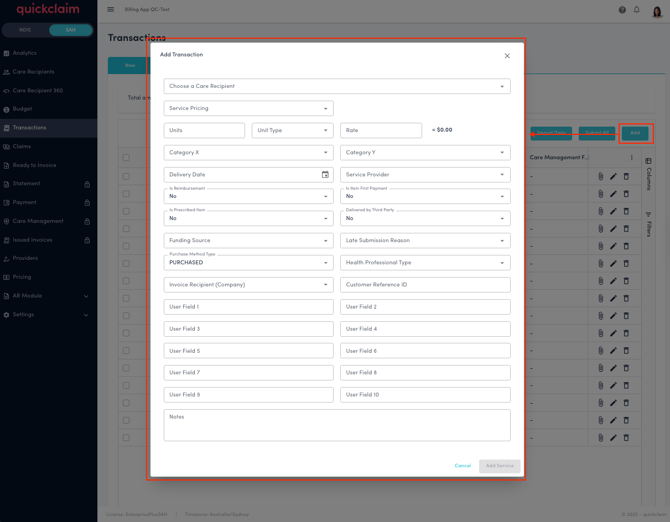
Adding Transactions
You can add transactions to quickclaim in two ways:
1. Manual Entry (via UI)
-
Click "Add" button to create a new transaction.
-
Choose a Care Recipient associated with the transaction and fill in all required fields, and click " Add Service" button. (Note: The care recipient needs to be listed in the Care Recipient page in the Support at Home module.
2. Import via Excel or CSV
-
Click the "Import" button on the top right.
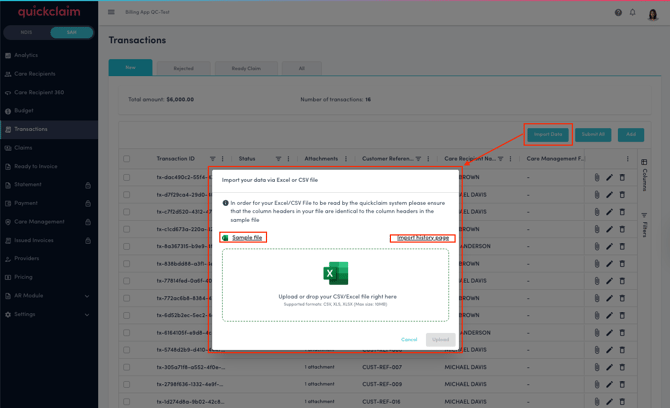
- In order for the uploaded Excel/CSV file to be read by the quickclaim system, ensure that the column headers in your file are identical to the column headers in the sample file. Click on the "Sample File" link in order to download the sample file. For more details on how to populate the sample file please click this link: HOW TO IMPORT TRANSACTIONS
- Once you have uploaded the file, click on "Import File History" link to view the transaction import history along with the status of the file.
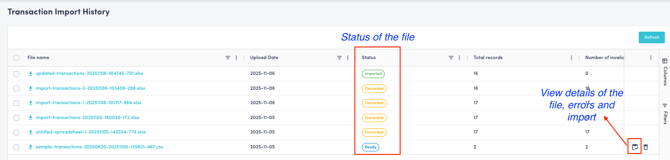
- The files that were uploaded can be downloaded by clicking on the blue File Name link. This table gives an overview of the file that was uploaded, along with details on how many records the file has versus the number of invalid records. You can also view the status of the file on this page and delete the history by clicking on the "delete" icon.
- If there are errors in the file, the status shows as " Error". The details of the error can be viewed by clicking on the details icon.
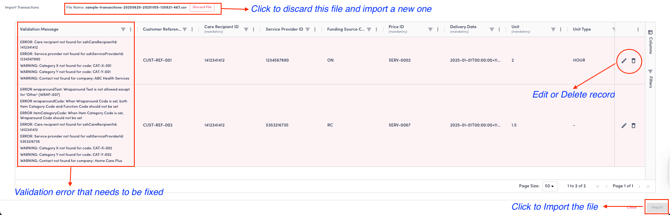
- If there are a lot of errors, the file can be discarded by clicking on the "discard" button. In this case, the new corrected version of the file needs to be imported again after fixing all validation issues.
- If there are just a few errors or just a few erroneous records, they can be fixed or deleted by using the action buttons: "edit" icon or "delete" icon on each row.
- When the file is ready for import and all the validation errors have been fixed, the "import" button is enabled. Click on the "import" button in order to import all the transactions in this file.
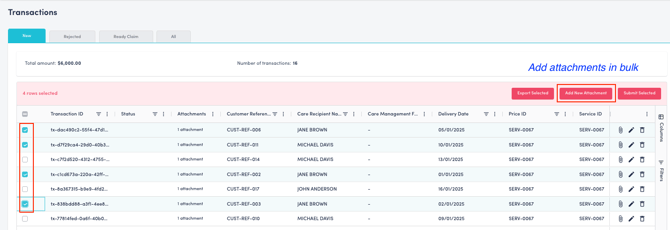
Adding Attachments to Transactions
After importing the transactions, attachments can be attached one by one or in bluk.
- In order to attach an attachment one by one, click on the "Attachment" icon on each record.
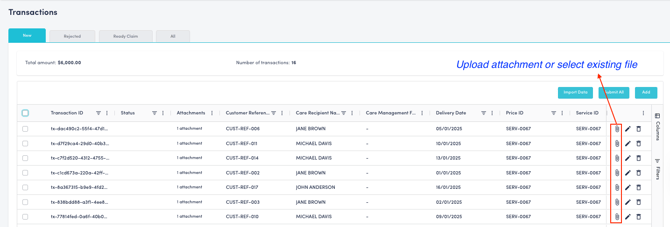
- On order to attach an attachment to multiple records at one, select the records and click on "Add New Attachment" button.
Submitting Transactions
Once transactions are listed on the new transactions tab:
-
One or multiple or all records can be selected and submitted by clicking on the "Submit" button.
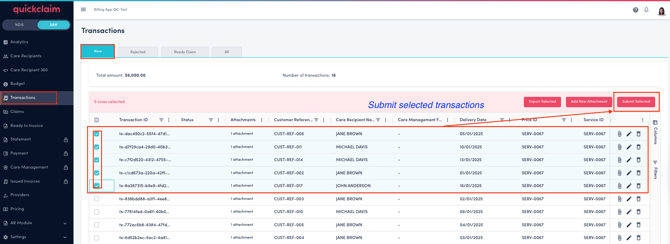
-
Once submitted, the transactions will move between tabs based on their status:

-
New → Ready Claim – when successfully validated and accepted.
-
New → Rejected – if validation or claim submission fails or is not accepted.
-
All Transactions – displays all records regardless of status.
-
Rejected Transactions
Within the Rejected tab:
-
Each transaction displays an error message explaining why it was rejected.
-
Status is shown as Rejected.
-
If the rejection reason requires supporting documentation (e.g., invoice, prescription, quote, or receipt),
click the Attachment Icon to:-
Upload a new file, or
-
Select an existing file from your quickclaim library.
-
After resolving errors and attaching necessary documents, you can resubmit the transaction.
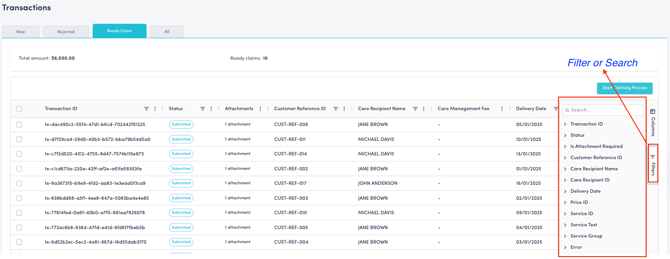
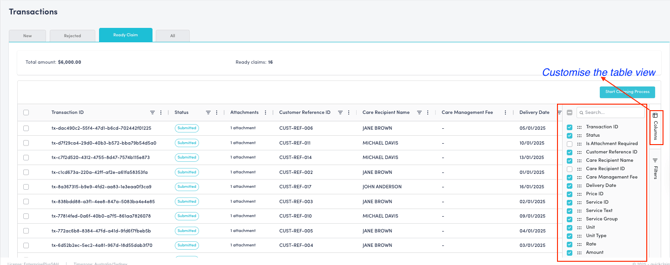
Filtering and Customising View
-
Use the Filter panel on the right-hand side to filter by any field such as date, care recipient, status, or funding source, etc.
-
A search bar is available to quickly locate specific records.
-
Advanced filtering options allow you to apply multiple criteria.
-
-
Use the Column Selector to choose which columns to display, enabling you to tailor your view as needed.
Reference Data & Glossary
Transaction Statuses
| Status | Meaning |
| OPEN | Initial state after creation; editable and submittable (no approval required). |
| INVALID | Validation failed (ERROR-level messages present); must be fixed before submission. |
| APPROVED | Optional user approval gate (only OPEN can transition here); also submittable. |
| PENDING_SUBMISSION | Queued/in-flight submission to be picked by the job; locked from user edits. Entered from OPEN/APPROVED/REJECTED. |
| SUBMITTED | Successfully submitted to SAH as an invoice item; awaiting claim lifecycle. |
| REJECTED | Submission attempt rejected by SAH due to client error; can be corrected and resubmitted. |
| CLAIMING | Claim has been initiated/approved at SAH and is in progress (non-terminal) |
| COMPLETED | Claim completed. ReadyToInvoice Items created and ready to be invoiced and pushed to the AR module.(terminal, paid). |
| TERMINATED | Claim rejected or cancelled by SAH (terminal failure; not updatable). |
| PENDING_CANCELLATION | User-requested cancellation in progress; preCancellationStatus holds prior status for rollback on error. |
| CANCELLED | Cancellation completed; transaction reversed post-submission (terminal). |
| DELETED | Soft-deleted transaction (terminal, excluded from normal operations). |