.png?width=512&height=100&name=Logo%20(side-by-side).png)
The Claims Management menu is organised into several tabs:
- Ready to Claim
- Claim Recovery
- Successful Claims
- Claim Batch History
- Claims in Error
- Remittance
Ready to claim
In this tab, you can review all Approved agency-managed claims.
Here’s what you can do:
-
Edit or reject claims using the buttons under the Action column on the right-hand side.
-
View the total number and total value of claims at the top of the screen.
-
Apply filters to display specific participants, time periods, products, and more.
-
Submit claims directly into PRODA by clicking the Claim button. You can usually check whether they were successful within one to a few hours of submission.
-
After submission, the system will issue invoices and automatically push them to BC. These invoices will be visible under Invoice Management, which we’ll cover later in this manual.

Claim recovery
This page displays claims that have not been approved by PRODA — meaning they’ve encountered some kind of issue. The Claim Recovery module allows you to review the problem, correct it, and then either re-claim from quickclaim or reject the claim to be pushed back to your CRM(if integrated).
On this page, you’ll see the Error column, which displays the error message from NDIS explaining why each claim was not approved. For example:
-
The product selected is not valid within the selected support start and/or end dates.
-
Service Booking does not exist.
-
The requested amount is more than the available service booking amount.
-
Multiple business validations failed → Resubmit the claim with correct details or contact the Customer Service Centre for further guidance.
You can also add notes about the actions you’ve taken in the Notes column. If you reject claims from the Claim Recovery page, the notes and error messages will automatically sync across to your CRM.
If you wish to reclaim from the Claim Recovery page, once you’ve made the necessary updates, you can submit the corrected claim by clicking the blue buttons in the upper right-hand corner.

Successful claims
This module displays all claims that have been successfully processed. You should see all successful claims within hours of claiming.

You can cancel a successful claim by clicking the “×” button under the Actions column on the right-hand side. A pop-up will appear asking you to provide a reason for cancelling the claim. Once confirmed, the system will issue a credit note, push it to your integrated finance system, and send the cancellation along with your reason to your integrated CRM. You will need to manually update your finance system if its not integrated with quickclaim.

CAP payments in NDIS
This concept, introduced by the NDIS, occurs when they accept a payment request (so they will end up in Successful Claims) but pay a lesser amount than claimed.
To reconcile capped payments, you can:
- View the successful page, which includes both the claimed amount and the paid amount.
- Check the claim batch history. In the claim batch details, a CAP flag set to "YES" indicates that the NDIS has capped the payment.
- Review the remittance page, where the NDIS specifies the amount paid for all transactions along with the PRN number.
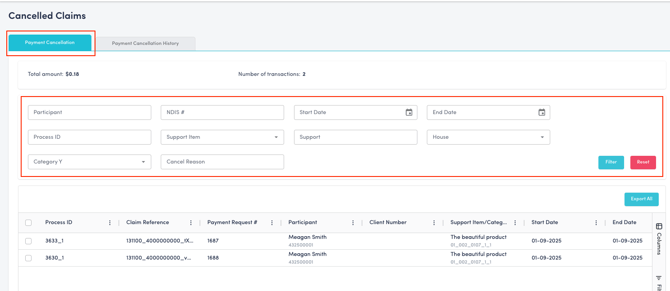
Cancelled claims
The Cancelled Claims module contains all claims that have been cancelled using the “×” button in the Actions column on the Successful Claims page. Once cancelled, the records first appear on this module and then in the Processing tab of the Service Delivery module.
There are 2 tabs on this page.
The Payment Cancellation tab displays cancelled claims that are still awaiting action. If a cancelled claim is deleted from Service Delivery, it will no longer appear in this tab. This view includes enhanced filtering options and helps users keep track of which cancellations have been actioned and which are still pending.
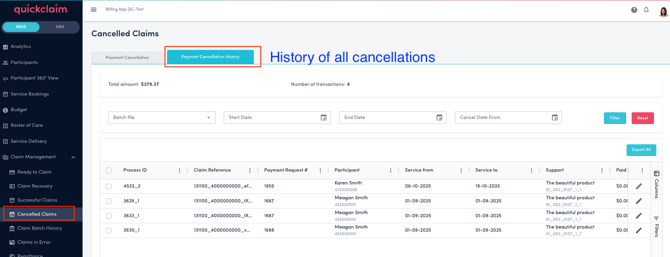
The Payment Cancellation History tab provides a complete record of all cancelled claims for audit and tracking purposes. It includes historical records, including those deleted from the Service Delivery processing tab. Users can add refund batch file details and export records, ensuring full transparency and easy reconciliation. It allows users to track and manage cancellations efficiently, ensuring nothing is missed during refund or reconciliation processes.
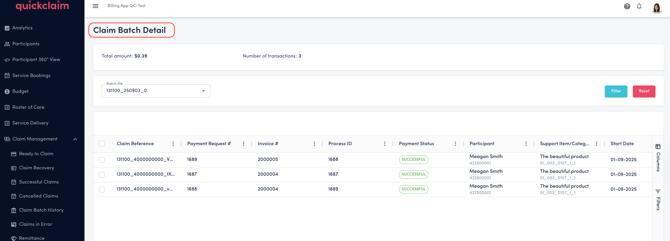
Claim batch history
Each time you claim a group of claims, it gets lodged as a “batch” in quickclaim and also in your finance software. This module allows you to view the detail of each batch, download it as a CSV file (using the icons under the Actions column on the right hand side).The status of claim batches submitted to the NDIS is also displayed. If a batch is currently being processed, a green “Processing” tag will be shown.
You can view the details of a batch by clicking the Details button in the Actions column. This will display all claim records within the batch, along with their individual claim statuses. The issued invoice number for each claim is also visible here.
Once a response is received from the NDIS, the amounts for successful and rejected claims will be updated and displayed on the Claim Batch History page.

Claims in error
This module displays all claims that have resulted in errors and have been rejected from the Claim Recovery page by clicking the Reject button.
These rejected claims will appear in the Claims in Error page and are also pushed back to your integrated CRM, along with the notes and error messages received from NDIS, which will be visible in in the CRM.
The transaction can then be edited and re-approved within the CRM, and upon approval, it will flow back into quickclaim the next time the interface pushes approved claims.
quickclaim recognises the re-claimed record as a second sequence of the previously rejected claim and will check whether the previously issued invoice for the rejected claim is still valid. If necessary, the system will issue credit notes, generate new invoices, and push them into yopur integrated finance system. These invoices will also be visible under Invoice Management.
The record will be removed from the Claims in Error page once the re-claim transaction is pushed into quickclaim.

Previous: Service Delivery
Next: Invoices